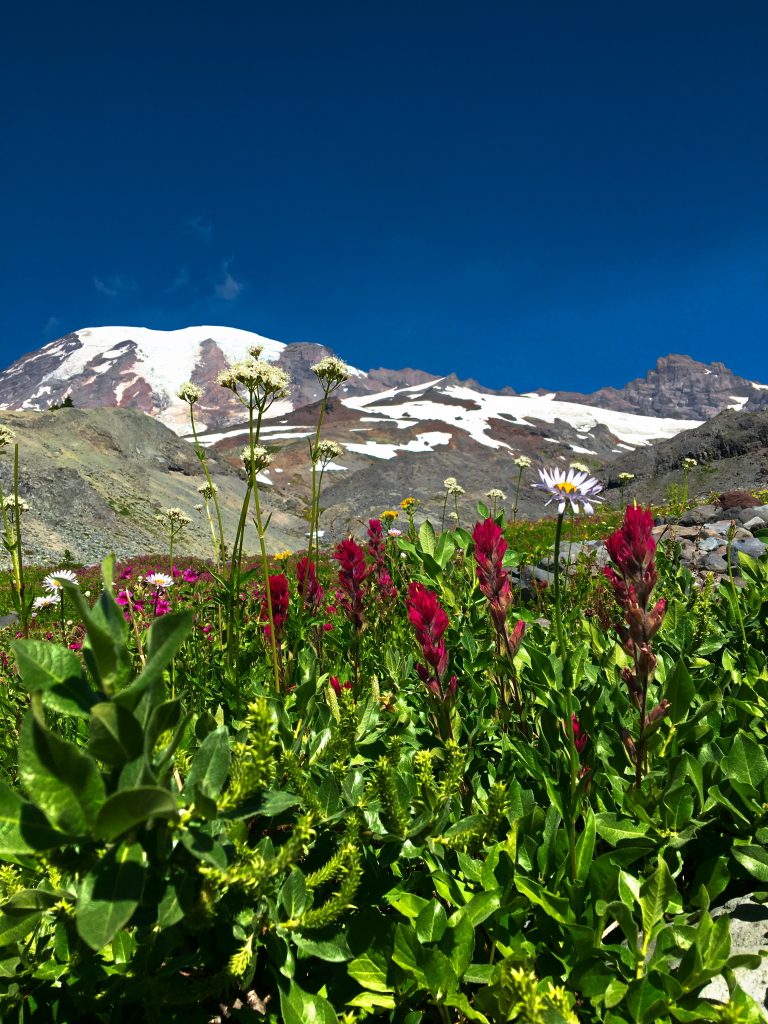
With spectacular views and vibrant wildflowers that astound and delight, the Skyline Trail loop is possibly the prettiest hike on Mount Rainier.

Chris & Mac
We outventure to help you outventure!
For us, outventuring isn’t just about adventure. It’s about the quiet moments — the first light on a ridgeline, the sound of a creek at camp, the shared laughter when the trail gets spicy. We believe the outdoors enriches people’s lives, and we want to help more folks experience that connection. Learn more about us HERE.
Scroll down for full slideshow.
Length: 8+ Mile Loop
Trailhead(s): Jackson Visitor Center – Skyline Trail
Elevation Gain: 2,000’ (approx)
Trail Type: Loop
Dogs: Not Allowed
Difficulty: Moderate
Permit Required? Yes – $35 National Park Entry Fee or Annual Pass Plus Timed Entry Permit (Beginning 2024, Follow this Link for Details)
Considerations: Snow
Season: Summer – Early Fall * (July-August Peak)
* It is possible to snowshoe here in the winter
Overview
With an abundance of stunning scenery and views, the Skyline Trail in Mount Rainier National Park is a bucket list hike – especially when skies are clear.
MOUNT RAINIER
At 14,410 feet above sea level Mount Rainier is the tallest of the volcanic peaks in the Cascade Mountain Range. It also has more glaciers than any other mountain (it has 25 of them) in the continental United States. Besides its beautiful glaciers, Mount Rainier also has many permanent snow fields, and it never loses all of its snow. Snows generally start to arrive in the early fall, and as the snowfall increases the roads and trails on Mount Rainier become inaccessible or are closed (gated) for the winter.
Even though it can take well into the summer for the snow on the roads and trails at higher elevations to clear, the lower elevations clear much faster. Once they do, visitors start flocking to Mount Rainier. As such, the trails which are easiest to reach experience a lot of foot traffic as soon as they are opened by park staff. One such trail which gets busy as soon as the snow clears, and it stays that way all summer, is the Skyline Trail.
HIKING THE SKYLINE TRAIL
“. . . the most luxuriant and the most extravagantly beautiful of all the alpine gardens I ever beheld in all my mountain-top wanderings.” – John Muir
This description of Mount Rainier, and the Skyline Trail in particular – is spot on.
Why is hiking the Skyline Trail so special? First, the unbelievable in-your-face views of Mount Rainier and the Nisqually Glacier. Second, the long range views from Panorama Point. Third, the abundantly diverse and vibrant array of magnificent wildflowers. Fourth, the exceptionally lovely streams and waterfalls. Get the picture? Hiking the Skyline Trail loop is a spectacular experience.
Skyline Trail to Panorama Point
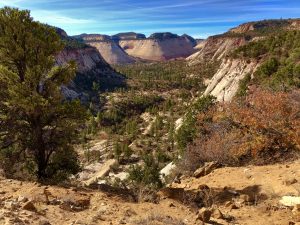
The Skyline Trail starts off as a steep paved path behind the Jackson Visitor Center. Firing up legs and lungs, the pavement lasts for about a half mile. After this, the trail is entirely natural, with steep areas employing stone and rock staircases to help control erosion and keep hikers on the path. There is no other way to describe the two mile trek up to Panorama Point on the Skyline Trail as anything but a climb. Always steadily, often sharply, and at times through snow fields, the trail continuously leads hikers up. Rest assured, there is always something fantastic to look at, and the views of the Nisqually Glacier along one rocky ridge on the way up are particularly mind blowing.
Panorama Point
Sitting at nearly 7,000 feet in elevation, Panorama Point is at its absolute best when there are no clouds or haze to block or muddle the views which are insanely incredible. Views of not only Mount Adams and Mount St. Helens are possible, but on an exceptionally clear day can extend as far as Mount Hood in Oregon! An information kiosk at Panorama Point identifies these peaks and other points of interest which can be seen from this vantage point.
Panorama Point to Paradise Glacier Trail
To continue on, hikers may choose to take the lower (most direct) route through a steep snow field. When park staff deems it too sketchy to traverse the icy, steep terrain hikers are directed to a higher route of the Skyline Trail which avoids it. Bypassing the snowfield, this upper trail is only about a half mile long and adds little in the way of distance versus taking the route through the snowfield. It takes hikers to the highest point on the mountain for this trail, and it rejoins the lower Skyline Trail at the end of the sketchy snowfield.
In addition to the snowfield below Panorama Point, more snowfields of varying lengths are often found along the trail as it descends through a rocky landscape. After about a mile the trail arrives at pretty Sluiskin Falls and the Paradise Glacier Trail junction.
Paradise Glacier
The Paradise Glacier Trail is a spur trail that many hikers no longer explore. Why? Because the ice caves which were once a huge draw have melted away. Hike this quiet trail anyways. You won’t be disappointed. The snow melt creeks and pretty wildflowers securely tucked under and around the rocks remind us that this barren landscape was once covered with ice, and they add an incredibly lovely note to this otherwise monotone landscape. Hike this trail to see a glacier in decline, and witness the glorious renewal of the land in this process. Note how vegetation at the edge of the glacier’s retreat is slowly but surely gaining ground. It is a remarkable experience to simply sit in this place and ponder its past, present, and future.
Return the way you came to rejoin the Skyline Trail and pass by the historical Stevens Van Trump Historical Monument which marks the campsite of the first hikers to summit Mount Rainier. Soon afterwards the Skyline Trail meets up with the Lakes Trail. For the most direct loop back to the Jackson Visitor Center stay on the Skyline Trail. Not long after it meets up with the Golden Gate Trail the Skyline Trail passes by Myrtle Falls and then returns hikers to the parking area.
Alternative Loop
This hike is so spectacular that the Skyline loop has found us traveling along it a few times. On one occasion, instead of following the Skyline Trail back we made a long loop by taking the Lakes Trail down to Longmire – Paradise Road. Because we had perfect, clear blue skies that day we decided to extend our hike to see more of Mount Rainier’s loveliness. Thus we hiked down to the shores of Reflection Lakes before heading back to the trailhead. This was a gorgeous add on, but going all the way down to Reflection Lakes only added distance and more climbing to our hike. Routing past Reflection Lakes just wasn’t worth the effort. When we hike this loop again (and we will) we’ll take the High Lakes Trail back instead.
Scroll down to learn about the GEAR WE USE and OTHER OUTVENTURES in this area.
Additional Information (Click below to follow links.)
Skyline Trail Loop & Paradise Glacier Slideshow
(Click image to expand.)
Gear We Use for Day Hiking
To see descriptions of the gear Chris & Mac use for day hiking, as well as links to manufacturers and retailers offering the gear for sale, please CLICK HERE.
Articles About Other Regional Outventures
SAFETY DISCLAIMER: The activities discussed in this website are outdoor activities and, as such, have inherent risks to which participants are exposed. It is not the intent of this website, nor is it possible due to the variability of weather, terrain, equipment, and experience, to detail all of those risks. The information contained in this site is informational, but not instructive nor exhaustive. It is the sole responsibility of the user to ensure he/she is in good health, fully prepared, and fully informed as to dangers before undertaking any of the activities discussed in this website and the user does so at his/her own risk. The user understands that by using this website he/she acknowledges and accepts all risks associated with use of information from this website and participation in any particular activity addressed herein. Please see “Terms of Use” for additional information.
Want to share this article with your friends? Click on the share button below:
Want more?
Get the latest outventure updates by following us on social media . . .