This article will discuss the basics of pre-ride mountain bike maintenance.

Chris & Mac
We outventure to help you outventure!
Support Grey Otter Outventures!
Please help us continue to bring you great content:
Mountain bikes have become very sophisticated. Whether you ride a ridged frame (no suspension), hardtail (front suspension only), full suspension, 1X, 2x, or 3x (number of chain rings in the front) with mechanical or hydraulic disc brakes, your mountain bike requires some pre-ride maintenance to keep performing well. This article will discuss the basics of pre-ride mountain bike maintenance, leaving more advanced maintenance discussions to later articles.
1. To Wash or Not to Wash You Mountain Bike?
Believe it or not, this is a big controversy in the mountain biking community. Mountain bikes get dirty and muddy. Where you ride will dictate how trashed your bike gets on each ride, but at some point you will have to address the dirt. Many people believe they should spray the bike down with a hose after each ride as part of proper bike maintenance. A lot ride areas have bike washes and we have even seen car washes with bike wash areas in British Columbia. That said, we have found that washing the bikes after each ride is bad for the bike.
Washing a bike, particularly if done wrong, can introduce water behind seals and lead to degradation of components. After speaking with numerous bike mechanics, the consensus we found is that air from a low pressure compressor works the best. Since moving to compressed air, the components on our bikes have lasted much longer and repair bills have become much smaller. We still, occasionally, have to use water if the bikes are particularly trashed, but we generally stick to just using compressed air. Given the amount of discussion in the mountain bike community about bike washing, we are sure some will stand firmly by washing the bikes with water, but our experience is that compressed air is the best approach.
Before we move on, we want to make a couple of notes about bike washing and using compressed air. For those who want to wash the bike before each ride, make sure the water pressure is low and you do not start spinning the wheels or crank while washing. This will help you to keep water from getting into the components, particularly the wheel hubs. Make sure to dry the bike. You should never store your bike wet. When using an air compressor, do not let the pressure get too high, to prevent forcing dirt behind the seals. You are trying to clean the dirt off the bike, not sandblast it.
2. Mountain Bike Tire Inflation
Once you have the bulk of the dirt off the bike, you should check your tire pressures to make sure the tires are properly inflated. This is particularly important if you run tubeless tires at low pressure. Tires generally lose air over the course of a few days or a week. If you run tubeless at low pressure, not maintaining a proper pressure can cause damage to your rims from impacts at low pressure or can cause a burp (the tire slips the rim releasing air). Make sure you are at least running the tires at the minimum pressure stated on the tire walls. This is also true for tires with tubes.
3. Mountain Bike Brakes and Frame
You should make sure the brakes are working properly, as well as any other moving parts such as seat dropper posts. It is also important to make sure the wheels are solidly attached to the bike and that your quick releases have not loosened. You can do this by holding the bike frame and attempting to wiggle the wheels, checking for any lateral movement. Also give the frame a quick look to make sure there is no damage from your previous ride. Mountain bikes take a lot of abuse on the trail and parts need to be checked regularly for safety and to keep the bike working properly.
3. Mountain Bike Drive Train
A biggie is the drivetrain. It includes the cassette (rear chain rings), the front chain ring(s), and chain. A mountain bike drivetrain takes a lot of abuse during rides. To keep your bike running well, it is important you clean it and lubricate the chain before every ride. Dirt in the drivetrain will result in poor shifting and chain drops (the chain coming off the chainrings).
The process is pretty simple. Get a cassette cleaning brush and spin the cassette while holding the brush against it. Then, using a rag, run the chain though the rag wiping off any dirt. Also wipe the pulley wheels on the rear derailleur (these are the cogs the chain goes through on the rear derailleur). After this, using a lubricant made for mountain bike chains, lubricate the chain, wait a couple of seconds for the lubrication to penetrate the chain, then wipe off the excess. It is important to make sure the lubricant is for mountain bikes. These lubricants are designed to shed, rather than attract, dirt. Most lubricants do attract dirt, but there are some very good ones specifically made for mountain bikes that do not allow most of the dirt to attach to the chain, keeping the drivetrain running smoothly throughout your ride.
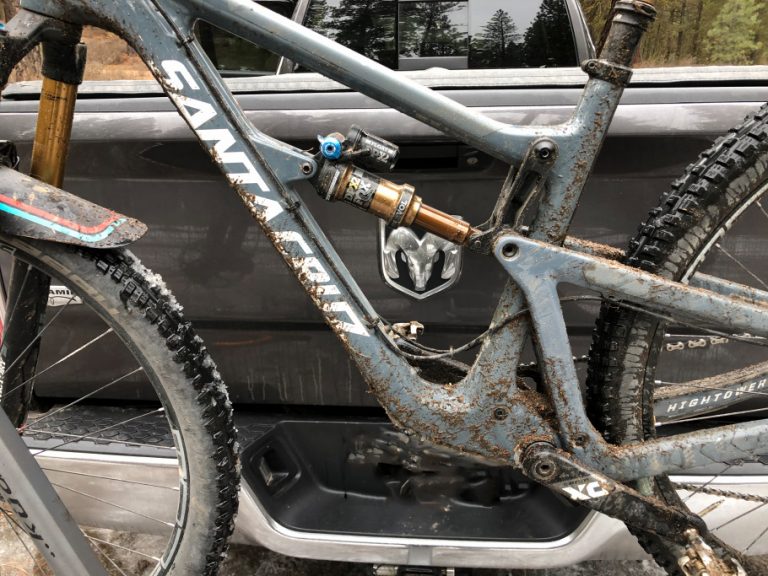
4. Mountain Bike Front Fork and Rear Shock
If you do not wash your bike after rides, it is a good idea to wipe the stanchions on your front fork and rear shock before your next ride. Importantly, you must be careful not to scratch the stanchions. To avoid this, use a rag to lightly brush off any dirt or sand, then take a clean rag and wipe SIDE-TO-SIDE, in case of scratches. Manufactures do not recommend wiping up and down, because if you vertically scratch the stanchion, it may allow water to seep into the fork or shock.
5. Mountain Bike Brake Rotors
With everything else clean, we like to wipe the rotors on the brakes with a clean rag as well. Rotors pick up dirt and brake pad material as we ride. Wiping them with a clean, dry rag removes dirt and excess brake material. A note here: The brakes are designed to have the brake pads transfer some of the pad material to the rotors to increase stopping power. Some riders let this build up until the brakes get touchy or noisy, then clean the rotors with denatured alcohol to remove the pad material and dirt. The brakes must then be broken back in to transfer some brake pad material back to the brakes for stopping power. Our experience is that this approach does not keep the brakes in top working order. We have found that simply wiping the rotors with a dry rag prior to each day on the trails keeps the rotors clean and working properly.
6. Bottom-Line
All this may sound like a hassle, but it really is not. After a few times, you will be able to prep your bike for a ride in less than 10 minutes. The time is well spent. Pre-ride mountain bike maintenance is a essential component of overall bike maintenance. Properly maintaining your bike will ensure not only your safety, but a long life for the bike and miles of fun riding.
Now get out there and hit the trails!
Gear We Use for Mountain Biking
To see descriptions of the gear Chris & Mac use for mountain biking, as well as links to manufacturers and retailers offering the gear for sale, please CLICK HERE.
SAFETY DISCLAIMER: The activities discussed in this website are outdoor activities and, as such, have inherent risks to which participants are exposed. It is not the intent of this website, nor is it possible due to the variability of weather, terrain, equipment, and experience, to detail all of those risks. The information contained in this site is informational, but not instructive nor exhaustive. It is the sole responsibility of the user to ensure he/she is in good health, fully prepared, and fully informed as to dangers before undertaking any of the activities discussed in this website and the user does so at his/her own risk. The user understands that by using this website he/she acknowledges and accepts all risks associated with use of information from this website and participation in any particular activity addressed herein. Please see “Terms of Use” for additional information.
Want to share this article with your friends? Click on the share button below: